
April 2014
Lots of work, but not too many photos. With the hull is completed and it is now right side up, so, she is ready to be completed. This means the deck, cabin, centerboard, cockpit and coach roof, tiller, masts....
First, I sanded the hull interior smooth. Then filleted and glass-taped the bulkheads to the hull sides. This is time-consuming, first pass is filleting using really thick mix of epoxy and talc applied with a "Glad" pastry bag, smoothed to shape with a piece of one-inch PVC pipe. Then cover with the 3 inch fiberglass tape, smooth this over with a coat or two of epoxy and talc. Then sand smooth by hand. This reinforces the joints between the plywood bulkheads and plywood topsides. I also filled in the bottom between the plank keel and the chine logs with 2 by pine or fir so there were no crevices for water to sit in the two anchor compartments, one fore and the other aft.
Once this filleting step was done, I painted the entire interior with a diluted epoxy sealer two or three times, to the point of rejection. The product I used was especially designed for this, E Bond 106 Polyamide Epoxy Coating from E Bond Epoxies in Ft Lauderdale. It has an extended pot life which you can extend longer by keeping left over mixed product in the freezer. So, now if water gets into the bottom of the boat, it just sits there on top of this coating and doesn't moisten the plywood. The entire interior will also be painted with Sherwin Williams two part Tile Clad epoxy paint once each part is completed.
Centerboard is constructed. The basic frame is 2x6's glued on edge. Then a hole is cut for the lead ballast and first layer of plywood is put on one side, the three 50-lb weights inserted and epoxied in. Then a layer if 3/8 in ply over that, then one more layer of ply on each side. Shaping to a foil profile as you go.
The centerboard trunk was pretty quick to make and install. I made the two halves one with the end posts in place, coated them with Dynel cloth and epoxy, then two coats of Awlgrip 545, then two coats of Blue Water Marine Copper Shield 35, a hard modified epoxy bottom paint, then joined them and made one last fillet at this joint and painted that joint. Next, I cut the hole in the floor of the cabin again. It had to be wider than I had thought as the trunk extends through the floor to the very bottom of the boat.
The trunk was made longer on the bottom than needed, then scribed, taken out and and cut and then epoxied to the floor of the hull. This joint will be finished on the bottom when the boat is lifted to install the centerboard.
Cabin and Coach Roof
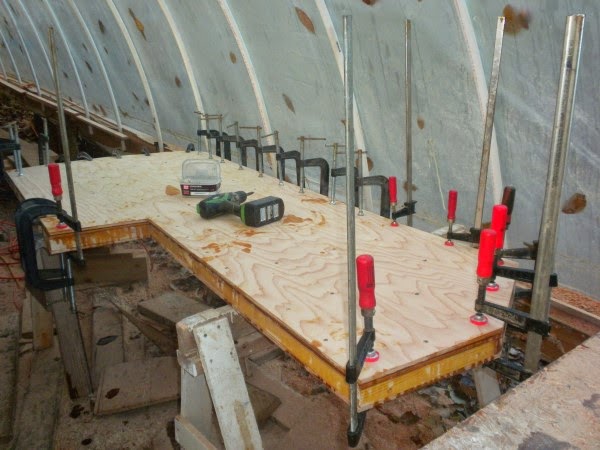
The bulkheads toward the rear of the cabin were only four feet high, so I extended them higher using a sine wave cut rather than just a straight joint. You can see this in this photo of the cockpit and cabin with the coach roof beams in place. The hole for the companionway hatch entry is quite large. One reason is that the ceiling of the cabin is low, about five feet, so, when cooking or working in the galley, if you leave the sliding hatch open, you can stand up - and also have a nice view.

Notice the darker color the E Bond 106 gives the plywood interior. This photo is quite a bit further along, the coach roof beams, deck beams and centerboard trunk having been installed.
The deck beams were made mostly of ash and the compound cuts where they connect with the sheer clamps and trunk carlins could not have been done without my Japanese hand saw I purchased at Lowes.
Below, a photo of laminating the after part of the cockpit coaming. I used some cheap ~3/8ths ply from Lowe's for this as Better Living, where I have bought all of my marine plywood, wasn't able to get any 1/4 inch marine plywood.
Below is the same, but more finished. These laminations were scarfed with the main part of the coaming, 12:1, twice; as the main coaming is two layers, one layer of half inch plywood which extends from the cabin sides plus an additional layer of 3/8" plywood from the cabin back to this joint.

Once this filleting step was done, I painted the entire interior with a diluted epoxy sealer two or three times, to the point of rejection. The product I used was especially designed for this, E Bond 106 Polyamide Epoxy Coating from E Bond Epoxies in Ft Lauderdale. It has an extended pot life which you can extend longer by keeping left over mixed product in the freezer. So, now if water gets into the bottom of the boat, it just sits there on top of this coating and doesn't moisten the plywood. The entire interior will also be painted with Sherwin Williams two part Tile Clad epoxy paint once each part is completed.
Centerboard is constructed. The basic frame is 2x6's glued on edge. Then a hole is cut for the lead ballast and first layer of plywood is put on one side, the three 50-lb weights inserted and epoxied in. Then a layer if 3/8 in ply over that, then one more layer of ply on each side. Shaping to a foil profile as you go.
 |
| Three 50 lb weights inserted |
 |
| Gluing up centerboard |
 |
| Putting Dynel cloth on centerboard |
 |
| Looking aft - Cabin ready for Centerboard |
 |
| Putting Dynel cloth on interior of Centerboard Trunk |
 |
| Trunk half primed and painted |
 |
| Slot in forward bulkhead and bottom for trunk |
 |
| Scribing the Centerboard Trunk bottom to fit flush with bottom of hull |
 |
| Centerboard Trunk installed |
The trunk was made longer on the bottom than needed, then scribed, taken out and and cut and then epoxied to the floor of the hull. This joint will be finished on the bottom when the boat is lifted to install the centerboard.
Cabin and Coach Roof
The cabin sides and coach roof beams took forever. Mostly because I didn't know what I was doing and thought this through and experimented many times before cutting the sides of the cabin where they meet the roof. Here is the beginning of this process.
 |
| Looking from the bow, above |
 |
| And again from the front, below |
In the photo above, you can see on the right, the 12:1 vertical scarf in the half inch plywood where the curved front portion will be attached. You can also see the fore mast partner where it joins the main deck beam.
The bulkheads toward the rear of the cabin were only four feet high, so I extended them higher using a sine wave cut rather than just a straight joint. You can see this in this photo of the cockpit and cabin with the coach roof beams in place. The hole for the companionway hatch entry is quite large. One reason is that the ceiling of the cabin is low, about five feet, so, when cooking or working in the galley, if you leave the sliding hatch open, you can stand up - and also have a nice view.

Notice the darker color the E Bond 106 gives the plywood interior. This photo is quite a bit further along, the coach roof beams, deck beams and centerboard trunk having been installed.
The deck beams were made mostly of ash and the compound cuts where they connect with the sheer clamps and trunk carlins could not have been done without my Japanese hand saw I purchased at Lowes.
 |
| Sawing an ash deck beam |
 |
| Bow deck stiffener with screws which will hold it |
 |
| Mast partner and screws |
 |
| Half beams for deck. Laminated coachroof beams on floor in background. |
 |
| Laminations - after end of cockpit coaming |
 |
| Same, but more finished |
In the photo above you can see the rear mast partner (no hole made for the mast yet the tiller post will also go through this) the deck beams, carlins for the rear hatch and the after deck stiffener.
Below is the coach roof with the interior ceiling of 3/16 inch plywood from Lowe's having been installed center to center on the beams and then 1 1/2 inch Dow board insulation epoxied between the beams and to the interior ceiling and being flush with the top of the laminated coachroof beams. I reinforced the joint where the cabin side meets the coachroof by putting a 1 1/2 wide piece of 1/2 inch plywood between each two beams and another strip of 1/2 plywood about two inches wide, tapered at the bottom, around the sides even with the top edge.
 |
| Coach roof - ready for top lawyer of 1/4 inch ply |
 |
| Close-up of roof with insulation in place |
Next will be the quarter inch plywood roof epoxied to complete this "sandwich" roof. Below is a detail of the centerboard lifting compression post. There will be a sheave at the top for lifting the centerboard.
 |
| Compression post for lifting centerboard |
 |
| Detail of mortise on top of post |
A brief interlude here as Mary Ann and I are moving from our home northeast of town into Charlottesville, so the boat has to have a new place to be completed. Below, she is being readied to be lowered on to Gil Roberts' equipment trailer.
 |
| Carlos helping to ready the hull for trailering - hi tech |
Arrival at my brother, Piers' home in Somerset, where we grew up, and my mother, Nichiko, lived for thirty years. Below is a photo of the Sharpie Nichiko arriving at her new home where work can start again.

It's progressing beautifully, Dad! What a fitting new home for the Sharpie Nichiko.
ReplyDeleteGreat to see this design being built. Reuel Parker is a good friend of mine and during a recent discussion with him of the perfect boat for my needs he highly recommended the Egret 31.5. I would love to see the project in person at some point. The shallow draft and possibility of trailering combined with seaworthiness make it a great boat. My last build was a Wharram Tiki 26 catamaran, but I sold it because the interiors of the hulls are too small and trailering and assembly is a major project. How will you handle stepping the masts? Will they be in tabernacles?
ReplyDeleteThanks for the note, Scott. I am a great fan of Reuel's and am presently reading the Voyages of Fishers Hornpipe. Ralph Munroe would be proud of him. Fabulous read! Reuel has been a great help to me, giving advice and helpful tips. I found it interesting that he was drafted the same year as I was, 1967. I was no fan of the US Army either.
DeleteSeaworthiness, shallow draft and trailering are all key features for me. From our home in Charlottesville, we can be in either Maine or Florida in 24 hours. It takes almost that many days via the ICW, like driving a lawn mower to Florida. Even on the outside, it takes almost a week. Plus; the slip fees! Storage out of the sun and rain costs nothing, and I can work on her in my back yard whenever I need.
My friend Stanley Woodward has suggested a method for stepping the masts, but I need to get more detail from him. He built the Moccasin, and had a good system for that boat. It is kind of far in the future for me at present. Definitely not tabernacles, however. I need to see how heavy they are after putting them together. The rear mast shouldn't be much of a problem. Attached is the yawl sail plan with a sprit boom.
I had to move the boat and am now completing a new hoop house at the new site, so have been delayed for a month or more.
You are welcome to visit any time, just let me know.