
April and May 2015 - Companionway Hatch
Winter (as much as it is in this climate-changed world) has pretty much passed, and with the warmer weather, I’m getting started on the new
projects. The next projects are to build the sliding hatch, then the spars and then on to the
interior. I have just finished making the companionway entrance smaller,
filling in new cabin roof to meet to the sides of the smaller companion entrance and so on.
It involved a good deal of work getting it all faired out and smooth, both the roof and the
hatchway. Then I put the stainless flat bars over the fir runners for the sliding hatch. Once this was done, I sanded
and primed the entire boat with Awlgrip 545. I don’t have any photos of
the details, but the companionway entrance ended up looking like this in the image below,
after two coats of Awlgrip 545.

Primed- May 2015 –
I’ll paint it when I’m almost finished
Sliding Companionway Hatch
I looked at a number of alternative ways to build the sliding hatch covering the companionway entrance, and I wanted to use Fred Bingham’s fantastic double-coaming sliding
hatch design. This one uses a double compartment forward so the water entering the crack between the hatch and the carlin below it gets trapped in a small compartment and drains out the sides from there. Crashing seas don't enter directly into the cabin area below, they only enter the first compartment. So I built that.


The double coamings with scuppers between each coaming which the sliding hatch sits over when it is closed, as it is now.
Spars
Nichiko will have two spars, the main mast,, 29'8" and the mizzen mast 20'. I did much agonizing and read many opinions and talked with Stanley Woodward about the best method for the masts. Hollow birdsmouth, hollow square or rectangular, solid… I ended up making the mizzen mast hollow square, using Douglas fir. The other spars are solid, the main boom is 15’ 9” long, the gaff 7’ 8” long, the mizzen sprit boom 10’ 5” long, the bowsprit 68″ long and the boomkin 54″ long. All of these, I made using Douglas fir.

Feb 15, 2015 photo of
mizzen being glued up
The
nice thing about this rectangular method (as opposed to the birdsmouth method) is that I could easily make it by myself. It is about 20
feet long, tapered and would set a sprit sail, I had originally planned. However, I later changed it to a Marconi rig as that allowed it to be set with a larger radius.

Mizzen mast, glued and sealed with epoxy
The wood is bit thick, and it isn’t very hollow. This is the small end,
however, I should be just able to get wires through the middle as the radio antenna will be mounted there.
Main Mast
On to the main mast which is a great deal larger and ended up weighing about 120 pounds, without any rigging. The hollow birdsmouth method is more complex and tedious than the rectangular method. It ends up being lighter than rectangular and possibly stronger, I understand.

The
details are a bit boring, but here is what I did to make the 30 foot main mast
using the birdsmouth method.
It is methodical,
but not difficult. Reuel gives the diameter of the mast at different points,
step, deck, half way, gaff, and top. I used the Ductworks calculator to find
the stave width (L) at each of these points. Reuel gives the thickness of
the staves, (H), as 1.25 inches. However, at the top of the mast this thickness
of 1.25 inches is too great, as Reuel specifies a diameter at the tip of a 2.5
inches, so it won’t happen. I reduced the calculation to H = 1.0 inch thick
staves there, and that came out to almost an inch width (L) at the top end
still leaving a small hole in the center.
I set
up 6 saw horses in a row and set them so as to have the tops in a straight
line, exactly. I used left-over wedges from scarfing process to adjust the
heights.
First,
I ran all 16 of the Douglas fir 2×4’s through my thickness planer, reducing the
thickness to 1.25 inches from 1.5 inches. Then I ripped all of them on the table saw down to
2.25 inches wide, a little larger than the maximum calculated width (L), deck
level. Then ran them through the table saw twice each along one edge putting, a 90 degree vee along that edge. I made this vee a tad too deep on purpose,
ensuring complete removal at the inside notch or corner, perhaps 1/32 of an
inch overlap.
Next I
scarfed the sixteen pieces together, two each, to make eight pieces, after
ripping to width. This was done with a cut-off saw, my old Milwaukee,
using two boards set as guides set for a 1/12 cut on saw horses. This gave
8 staves of about 31.5 feet, and I’ll stagger then so as to not have all
scarfs at the same point on the final mast of 29 feet eight inches.
Next, I
marked and cut one stave and shaped it with a block plane and my 8 inch Makita
disk sander, 40 grit, till it looked good, with the width (L) gradually
changing, corresponding to the calculated results and giving a nice-looking
parabolic taper.
So far
so good. I used this one as a template to mark each of the rest and cut them
one by one with the cut-off saw.
This is
getting tiresome, but next, I lined them up with vee’s facing down, clamped together
tightly, and sanded them with the Makita, where they weren’t identical, to a
uniform decreasing width. That thing will gobble up some wood in a hurry.
Alright, to reduce the thickness at the top end of the mast, I needed to plane each one on the two “flat” sides (not the “vee” side and its opposite side) to a nice taper from near where the gaff will sit to the top end. The total to remove at the top was about 1/4 inch in thickness. From (H) = 1.25 to (H) = 1.0. This meant 1/4 inch total thickness reduction at the top, but starting from almost no reduction near the gaff point. So, I set the electric plane to 1/16 inch depth, and planed each stave on both sides; one pass from just above the gaff point to the tip, and two passes from the midpoint of the first pass to the tip or top. 4 x 1/16 = 1/4 total reduction.
Then, I
lined them up, vee’s facing to one side, and had a look. When I clamped them
lightly, the decreasing curve of the combined taper of the width, (L), looked
off, too abrupt at one point, about a foot above the gaff. So, I clamped them
all together, vee down, and reduced this “hump” causing this ugly curve with
the 8 inch Makita sander again, 40 grit. It’s really like a sculpting tool.
Next, I put some 8 in wide ply stations vertically on each saw horse with U-shaped holes cut near the top, each U-shaped “hole” smaller toward the top end of the “mast”. Chalk line to get them straight side to side. Screwed to the saw horses.
I cut a
piece of 5 mil plastic about a foot wide and 30 feet long, from the edge of my
60 foot greenhouse/workshop; extra lying on the ground. Will put this between
the four bottom and four top staves when we glue it up, so I can separate the
two halves and put in blocking, wires… and later glue two halves together.
Around September 15th, with the help of three “volunteers,” we glued the mast together. We actually had plenty of time to get it done before the epoxy started to harden.
I am much obliged to Chris Halstead, Robert Foster, and my brother Piers for making this happen. As it turned out, we had plenty of time to get everything painted up and glued together before the epoxy even began to set up. We used rope and Spanish windlass and also steel hose clamps to tighten the staves together. The hose clamps worked very well, you need one about every foot or two.
I also made the boom jaws, laminating white oak for these, about ten layers of oak, each about an eighth in thickness with a layer of Dynel or Xynole polyester cloth in between each piece.

Staves being shaped –
double taper, that is tapered on two of the four sides
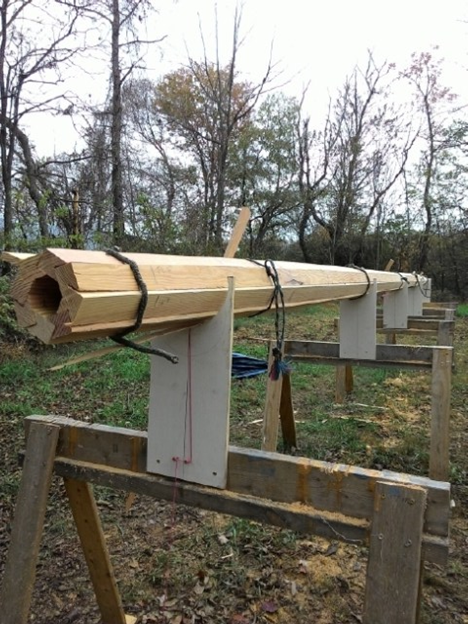
Dry fitting main mast
Got some help from Floyd Hill, from down the road, and dry fitted the staves. Raised and lowered the stations on each horse till middle stave in one side was straight, within 1/32 of an inch measured from the top of each saw horse. It looks good and straight.
Cabin Interior
2016
January and February were pretty dismal and cold in Virginia, especially for epoxy
and working “outdoors.” We went to Peru and Bolivia for almost a month. What an
amazing change! Fortunately, I happened to have 1491: New
Revelations of the Americas Before Columbus by Charles C. Mann
on my Kindle as this explained what we were seeing regarding the history and
culture of ancient Peru and Bolivia and, of course the people and the present.
A great deal about pre-Columbus America has been discovered since I was
graduated from Penn in 1967. I used to live in Colombia, so am familiar with
South America and speak Spanish. Even if you aren’t going to visit South
America, I recommend this book as it reveals to the reader what pre-Columbian America may have been like; including North America where the United States
are now. Here is a link to a review of the book by Kevin Baker
in the New York Times Book Review. It is interesting to know more about the 100
million people living in the Americas in 1491. And to find out
about organized Peruvian cultures which date back almost ten thousand
years.
Well,
back to the boat. The sliding hatch is installed, and it fits nicely.

February 2016
I’m working on the cabinets, ice box and head in the cabin. It is mostly done, but it has been cold and we went to Peru and Bolivia for three weeks in January. I have made the interior compartment of the ice box .
What is left to do is building out the interior of the cabin: the galley, settees, cabinets, water tanks, and electrical things such as lights and navigation. Plus the rigging! Not to mention installing the centerboard and rudder. Plenty to look forward to.
Cabin Interior
The framework and actual cabinets, water storage, ice box, and head all add a great deal of strength to the entire boat.

Port settee and
shelf/backrest frame
The cabinets and settees go in. Beneath the seats are water storage tanks painted with BrewCoat epoxy paint. Neat stuff!! (http://sscoatings.net/brewcoat.htm)


Water tank top is also the settee seat base
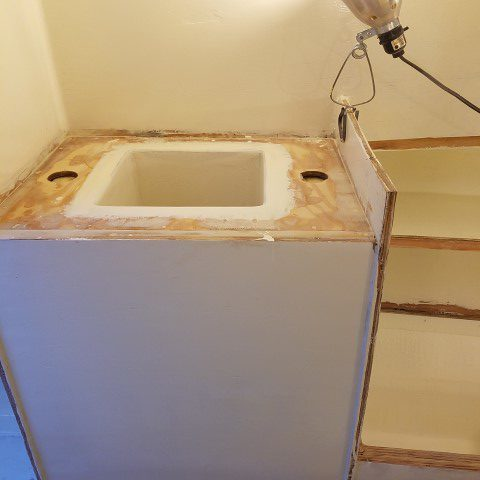
The Ice Box
Just aft of the port settee goes the ice box, to be isolated in almost four inches of foam on all sides. First, I made the box shaped to fit the space and suspended it in place.
Ice box suspended in place
The completed ice box is suspended in side of its cabinet and then the foam will be poured around it. After this photo, I put the front and top of the surrounding cabinet and filled it with foam.
Ice bin ready for pouring the foam
There is a lot more work here than shown, as the entire ice bin was lined with xynole cloth impregnated with epoxy then painted with two coats of Brew Coat, then the top glued to the main bin. The exterior corner seams were fiberglass taped and epoxy coated. Foam was poured in almost to the countertop level, then the countertop base was put on which has two holes to top off the foam through.
The Head
The head and cabinet above it are installed. The head can be pulled out to use, then slid back beneath the cabinet. There isn’t room to dedicate a separate room for the head.

Head, with a cabinet above
So, the port side of the cabin is pretty much built, and it is becoming evident that there is not but so much room in this cabin for a 32 foot boat.

Settee finished out
along with ice box on left
Here is what it looks like after the settees, the ice box, head and cabinet above the head are finished out. Above is a photo of the port side settee. The Wiley ports and fiddles are installed in this photo.
The Galley
Next, the galley goes together. First the shelves and framework are put in then the face is attached.

Faces of the cabinets are being painted here

Galley cabinet face being epoxied in place
The galley cabinet face, including the doors, is being epoxied on the cabinet frame. I had made the drawers a year or so ago. They don’t really match, so I may trim them down and paint them white also. Later. The interior paint I used is Sherwin Williams Tile Clad two-part epoxy. It is very high VOC, but once hardened, is quite inert and very easy to wipe clean making it really a pleasure to keep clean of dust and mold.

Galley drawers
The drawers have holes for pulls, so air can circulate easily preventing condensation. Also, I put two inch holes between the compartments in the galley cabinet so make for more air circulation.
Back Outside
On the exterior, I painted the entire boat, three coats of Sherwin Williams linear polyurethane. I saved about $400 using this rather than Awlgrip, but not sure it was worth it, although it looks good. Actually, the exterior paint has held up quite well, - I am writing this five years later.

White paint – at least
three or four coats – sprayed on
This is a 4:1 ratio paint, so measuring carefully is important. With the proper hardener and reducer, it works quite well. I used a $25.00 sprayer from Tractor Supply.

Sherwin Williams
Hi-solids Polyurethane and Hardener
Here is an image of one of the paint cans and the hardener.
Wiley Ports
After getting the paint on, I could proceed with the bowsprit, boomkin, chainplates, install the Wiley ports and so on.
I could write much about making the Wiley ports. Stanley Woodward suggested I use them rather than purchasing port holes or portlights. More authentic, Francis Herreshoff designed them, I believe, cheaper than store bought port lights, you can leave them open when it is raining and still have good ventilation, and they are pretty. I made a number of trial efforts in September and October 2016.

Mock up of Wiley Port
This mock up is too heavy, but was good practice on how to do it. I fooled around with the design until I came up with this final version, below.

Wiley Port – final
version
The Wiley ports were installed using butyl under the edges of the frames and also under the small bolts with washers as shown below. Butyl is from www.pbase.com.

Wiley ports going to
be put on with butyl under the washers and countersunk holes
I got auto window glass cut for these. It is safety glass, like what is in most cars for the windows you roll up and down. Then, I made some storm covers for these Wiley ports. They are covered with xynole and epoxy, then Awlgrip 545 primer and three coats of Awlgrip paint. They can be bolted in place from the inside.

Wiley port storm cover
This photo above is showing the cover before being painted. Just to have a look. Below is an image showing the Wiley ports installed.

Starboard side with the Wiley
ports installed
Cabin Interior finishing
No comments:
Post a Comment